As the vibrant greens of summer fade and the chill of winter approaches, your gas string trimmer, a faithful companion in maintaining a pristine yard, deserves proper care before its seasonal hibernation. Neglecting to winterize this essential tool can lead to frustrating and costly issues come spring, from hard starts and reduced performance to permanent damage to its delicate internal components. Taking a few proactive steps now will ensure your string trimmer fires up reliably next season, ready to tackle overgrown edges and unruly weeds without a hitch. This comprehensive guide will walk you through each critical step to safely and effectively winterize your gas string trimmer at home, extending its lifespan and preserving your investment.
Why Winterizing Your Gas String Trimmer is Crucial
Winterizing your gas string trimmer is more than just a chore; it’s an investment in the longevity and reliability of your equipment. The primary culprits for off-season damage are stale fuel, moisture, and accumulated debris. Gasoline, especially ethanol-blended fuel, can degrade in as little as 30 days, forming varnish and gum deposits that clog carburetors and fuel lines, making spring startups a nightmare. Moisture, often a byproduct of temperature fluctuations, can lead to rust and corrosion on metal parts, particularly inside the engine and fuel tank. Furthermore, lingering grass clippings and dirt can trap moisture, accelerating rust and causing components to seize. Proper winterization prevents these issues, safeguarding your string trimmer against internal damage, expensive repairs, and diminished performance, ensuring it’s ready for action when spring returns.
Essential Tools and Materials for Winterization
Before you begin the winterization process, gather the necessary tools and materials to ensure a smooth and efficient workflow. Having everything on hand will help you complete each step thoroughly and safely.
- Fuel Stabilizer: Essential if you choose not to drain the fuel. Look for products designed for small engines, particularly those that address ethanol concerns.
- Clean Fuel Container: For storing stabilized fuel or safely disposing of old fuel.
- Socket Wrench (Spark Plug Wrench): To remove and reinstall the spark plug.
- Wire Brush: For cleaning the spark plug and removing stubborn dirt from the trimmer.
- Stiff Brush or Putty Knife: For scraping off caked-on grass and debris.
- Clean Rags or Microfiber Cloths: For wiping down surfaces and applying lubricants.
- Compressed Air or Leaf Blower: Optional, for blowing off loose debris.
- Engine Oil (Small Amount): For lubricating the cylinder (often 2-stroke oil for 2-cycle engines). Fogging oil is also a great option.
- Rust-Inhibiting Spray or Light Lubricating Oil (e.g., WD-40): For protecting metal components.
- New Spark Plug (Optional): If your current one is old or heavily fouled.
- New Air Filter (Optional): If your current one is dirty beyond cleaning.
- New Trimmer Line (Optional): To replace old or brittle line.
- Safety Glasses and Gloves: Always protect your eyes and hands.
- Drain Pan: For safely collecting drained fuel or oil.
Step-by-Step Guide to Winterizing Your Gas String Trimmer
Winterizing your gas string trimmer is a methodical process. Follow these steps carefully to ensure every component is prepared for the cold months ahead.
Fuel System Preparation: Drain or Stabilize?
The most critical step in winterizing a gas string trimmer involves its fuel system. You have two main options: completely draining the fuel or treating it with a stabilizer. Both aim to prevent stale fuel from damaging the engine.
> “The single most important step you can take in winterizing outdoor power equipment is stabilizing or removing the fuel. If your piece of power equipment sits outside with untreated fuel in it all winter, there’s a good chance it won’t start when the spring rolls around.” – Blain’s Farm & Fleet Blog
-
Option 1: Drain the Fuel Completely
- For lighter tools like string trimmers, draining the gas entirely is often recommended.
- Carefully siphon or pour the fuel from the tank into an approved, clean fuel container for disposal or proper storage.
- After draining the tank, start the engine and let it run until it sputters and dies. This ensures all fuel is cleared from the carburetor and fuel lines, preventing gum and varnish buildup. You may need to press the primer bulb repeatedly to clear all remaining fuel.
- Properly dispose of old fuel at a local hazardous waste facility.
-
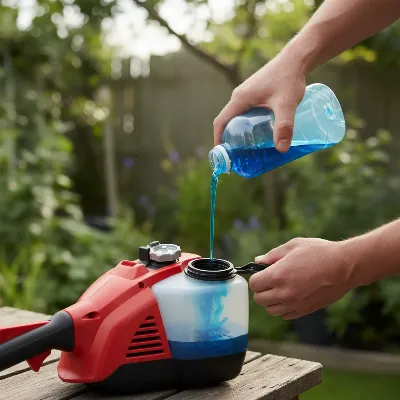
Option 2: Use a Fuel Stabilizer
- If draining isn’t preferred, or for longer storage periods (up to 24 months), a fuel stabilizer is an excellent alternative.
- Fill your fuel tank with fresh gasoline (preferably ethanol-free, or at least less than 10% ethanol).
- Add the recommended amount of fuel stabilizer to the tank, following the product instructions.
- Run the engine for 5-10 minutes to allow the stabilized fuel to circulate throughout the entire fuel system, including the carburetor. This prevents the fuel from degrading and forming harmful deposits.
|
Our Picks for the Best String Trimmer in 2026
As an Amazon Associate I earn from qualifying purchases.
|
||
| Num | Product | Action |
|---|---|---|
| 1 | BLACK+DECKER 20V MAX Weed Eater, Edger and Sweeper Combo, Includes 2 Batteries and Charger, Cordless Electric Weed Wacker and 130 Mph Hard Surface Leaf Blower, 10 in. (LCC222) |

|
| 2 | WORX Cordless String Trimmer & Lawn Edger, 12'' Electric Weed Wacker with 5.5 LBS, 20V Weed Eater with 90° Pivoting Head, Battery & Charger Included, WG170.2 |
|
| 3 | Houselife 12" Cordless Weed Eater Compatible with Dewalt 20V Max Battery (No Battery), Auto Feed Cordless String Trimmer&Weed Wacker, Lightweight Electric 20V Weed Trimmer&Edger for Lawn, Garden, Yard |
|
| 4 | BLACK+DECKER String Trimmer, Electric, 14-inch (BESTE620) |
|
| 5 | 20V 12" Cordless String Trimmer With 2 X 4.0Ah Battery and Charger, Electric Grass Trimmer Battery Powered Eater String, Edger Lawn Tool Grass Cutter With 8pcs Line, Lawn Mover For Garden Yard, Orange |
|
| 6 | WORX Cordless String Trimmer & Lawn Edger, 12'' Electric Weed Wacker with 4.6 LBS, 20V Weed Eater with 90° Pivoting Head, Batteries & Charger Not Included, WG170.9 |
|
| 7 | CRAFTSMAN WEEDWACKER® String Trimmer, 6.5 Amp, 14-Inch (CMEST913) |
|
| 8 | BLACK+DECKER Weed Wacker with Auto Feed, 14-Inch 2 in 1 String Trimmer Lawn Edger, Powerful 6.5-Amp Lightweight Electric Weed Eater (BESTA510) |
|
| 9 | Cordless String Trimmer Compatible with Milwaukee M18 18V Battery(Tool Only), 12-Inch 3-in-1 Weed Eater with 8500RPM Upgraded Motor, Automatic Line Feed Weed Wacker for Lawn Edging and Mowing-Red |
|
| 10 | Cordless String Trimmer Compatible with Dewalt 20V MAX Battery, 12-Inch Weed Wacker Cordless Auto Line Feed,Electric Weed Eater Battery Powered Grass Trimmer w/6 Line Spools(Tool Only) |
|
 A close-up shot of a person adding fuel stabilizer to the gas tank of a string trimmer, with fresh gasoline visible in the tank. Realistic, outdoor lighting, eye-level perspective.
Thorough Cleaning and Inspection
After addressing the fuel system, a thorough cleaning is paramount. Accumulated dirt, grass, and debris can trap moisture, leading to rust and corrosion, and can even hide underlying damage.
- Remove Debris: Use a stiff brush or putty knife to scrape off any caked-on grass, dirt, and oil from the trimmer head, shaft, engine casing, and air vents. Pay special attention to the underside of the trimmer head. Compressed air or a leaf blower can help remove loose particles.
- Wash and Dry: For stubborn grime, you can use a damp cloth with mild soap and water. Crucially, ensure the trimmer is completely dry before storage to prevent moisture-induced rust.
- Inspect for Damage: While cleaning, inspect the entire trimmer for any signs of wear, cracks, loose bolts, or damaged components (e.g., fuel lines, safety guards, handles). Replace or repair any damaged parts now to avoid issues in the spring.
- Rust Prevention: Lightly spray exposed metal parts with a rust-inhibiting enamel or a general-purpose mineral oil (like WD-40) to create a protective barrier against moisture.
Engine Care: Spark Plug, Air Filter, and Cylinder Protection
These internal engine components are vital for proper function and require attention to ensure a quick start next season.
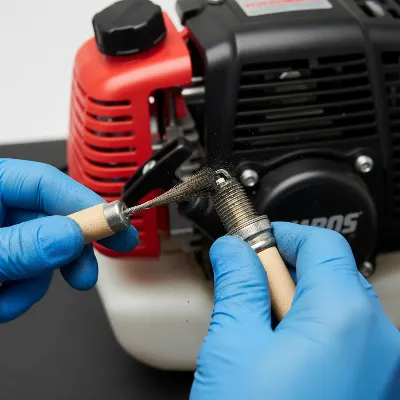
- Spark Plug:
- Disconnect the spark plug wire for safety.
- Remove the spark plug using a socket wrench.
- Inspect the spark plug for carbon buildup or damage. Clean it with a wire brush if it’s dirty, or replace it with a new one if it’s heavily fouled or worn.
- Optional (but recommended for long storage): Pour a few drops (about a teaspoon) of 2-cycle engine oil or fogging oil directly into the spark plug hole. Gently pull the starter cord a few times to distribute the oil, coating the cylinder walls and preventing rust during inactivity.
- Reinstall the cleaned or new spark plug, hand-tightening first, then a quarter turn with the wrench. Reconnect the spark plug wire.
- Air Filter:
- Remove the air filter.
- Clean foam filters with warm, soapy water, rinse, and let dry completely. Paper filters should be gently tapped to remove debris or replaced if very dirty.
- Install the cleaned or a new air filter.
 A person cleaning the spark plug of a gas string trimmer engine as part of winterization maintenance. Close-up, detailed shot.
Trimmer Head and Line Maintenance
The business end of your string trimmer also needs attention.
- Inspect and Replace Trimmer Line: Over winter, old trimmer line can become brittle and prone to breaking. It’s a good practice to replace it at the end of the season. Remove any remaining line from the spool.
- Clean the Trimmer Head: Thoroughly clean the trimmer head, removing any dried grass, sap, or tangled debris. Ensure all moving parts of the head are free to move.
Lubrication and Final Checks
A few final touches will ensure all parts are protected.
- Lubricate Moving Parts: Apply a light coat of lubricating oil to any exposed pivot points, hinges, or rotating parts on the trimmer shaft to prevent rust and ensure smooth operation.
- Check Fasteners: Briefly go over the trimmer and tighten any loose screws, nuts, or bolts you may have noticed during cleaning.
Proper Storage for the Off-Season
Where and how you store your gas string trimmer significantly impacts its condition in the spring.
- Location, Location, Location: Store your trimmer in a cool, dry, clean, and well-ventilated area such as a garage, shed, or basement. Avoid damp or excessively humid environments, as these promote rust and corrosion.
- Position: Many string trimmers can be stored vertically by hanging them on a wall hook. This saves space and helps prevent any residual fuel or oil from settling in undesirable places. If storing horizontally, ensure it’s on a clean, flat surface.
- Protection: Consider using a breathable cover to protect the trimmer from dust and pests. Avoid outdoor storage where it would be exposed to elements like snow, ice, and moisture.
Common Mistakes to Avoid When Winterizing
Even with the best intentions, some common errors can undermine your winterization efforts. Be mindful of these pitfalls:
- Leaving Untreated Fuel in the Tank: This is the most common and damaging mistake. Stale fuel is the leading cause of spring no-starts and carburetor issues. Always drain or stabilize your fuel.
- Skipping the Cleaning: Dried grass and debris can trap moisture, leading to rust and corrosion, and can attract pests.
- Forgetting Engine Lubrication: Neglecting to add oil to the cylinder (or fogging oil) leaves internal metal parts vulnerable to rust and corrosion.
- Storing in a Damp Environment: High humidity or direct exposure to moisture will negate all your cleaning and rust-prevention efforts. Choose a dry storage location.
- Ignoring the Owner’s Manual: Your string trimmer’s manufacturer’s manual contains specific recommendations for your model. Always consult it for detailed instructions.
Conclusion
Properly winterizing your gas string trimmer is a simple yet vital annual ritual that protects your investment and guarantees hassle-free yard work next spring. By diligently addressing the fuel system, performing a thorough cleaning, caring for the engine’s internal components, and ensuring correct storage, you proactively combat the damaging effects of inactivity and harsh winter conditions. Taking the time now to prepare your equipment will save you frustration, time, and money when the new growing season calls. What steps will you take this year to ensure your gas string trimmer is ready for a strong start next spring?
Frequently Asked Questions
What happens if I don’t winterize my gas string trimmer?
If you don’t winterize your gas string trimmer, you risk issues like stale fuel clogging the carburetor, rust and corrosion forming on internal engine parts due to moisture, and damaged or brittle trimmer line. These problems can lead to difficult starting, poor performance, costly repairs, and a shortened lifespan for your tool.
Is it better to drain the fuel or use a fuel stabilizer for winter storage?
Both draining the fuel completely and using a high-quality fuel stabilizer are effective methods. Draining ensures no old fuel can cause problems, while stabilizer keeps fresh fuel viable for up to 24 months, preventing gum and varnish buildup. The choice often depends on personal preference and how long the equipment will be stored.
Can I use regular car fuel in my gas string trimmer?
Most gas string trimmers use two-stroke engines that require a specific gasoline and oil mixture. Using straight car fuel (which is typically for four-stroke engines) or an incorrect fuel-to-oil ratio can severely damage the engine. Always consult your owner’s manual for the correct fuel type and mixing ratio.
How often should I replace the spark plug and air filter when winterizing?
It’s a good practice to inspect your spark plug and air filter annually as part of your winterization routine. If they are dirty, replace or clean them. Replacing them at least once a year or every few seasons, especially with heavy use, helps maintain optimal engine performance.
Where is the best place to store my string trimmer during winter?
The best place to store your string trimmer is in a cool, dry, and clean environment like a garage, shed, or basement. It’s crucial to protect it from extreme temperatures, dampness, and humidity, which can cause rust and corrosion. Storing it vertically can also save space and prevent leaks.