Restringing a string trimmer head is a straightforward process that typically takes 10-15 minutes, primarily involving winding new line onto a spool and reassembling the head. The most common type, the bump-feed head, requires cutting 20 to 25 feet of line and winding it tightly onto the spool in the direction indicated by arrows. Fixed-line heads are simpler, using pre-cut 10-12 inch segments, while automatic-feed heads often use spools or pre-wound cartridges.
Understanding Your String Trimmer Head: Types and Mechanisms
Before you begin restringing, it’s crucial to understand the type of string trimmer head you’re working with, as this dictates the specific method you’ll employ. While all string trimmers spin a cutting line at high speeds to tackle weeds and grass, their line advancement mechanisms vary significantly.
The most common type is the bump-feed head. With this design, a simple tap of the trimmer head on the ground during operation releases more line from an internal spool. This mechanism is popular for its convenience, allowing users to advance line without stopping the machine. For best gas roundups on this site.
Less common, but still prevalent, are fixed-line heads (sometimes called locking heads). These don’t use a continuous spool of line; instead, you feed individual, pre-cut segments of trimmer line directly into designated slots on the head. When a line wears out, you simply replace that segment. This offers precise control over line usage but requires more frequent manual intervention for replacement.
Finally, automatic-feed heads advance the line automatically as it wears down, often utilizing a sensor or internal mechanism to detect when more line is needed. While seemingly the most convenient, these can sometimes consume line more quickly, and their restringing process typically involves a spool similar to bump-feed models, or in some cases, a pre-wound cartridge. Knowing which head type you have will save you time and frustration, ensuring you follow the correct restringing procedure for your specific tool.
Essential Tools and Materials for Restringing Your Trimmer
Having the right tools and materials on hand before you start will make the restringing process smooth and efficient. Gathering these items beforehand prevents mid-task interruptions and ensures safety.
First and foremost, safety gear is essential. Always wear durable work gloves to protect your hands from potential cuts from the sharp trimmer line and from any hot components of the trimmer head. Eye protection is also recommended as a general safety practice when working with power tools.
You’ll need a cutting tool to snip your new trimmer line to the appropriate length. Sharp scissors, heavy-duty utility shears, or a pocket knife will work effectively. For older line remnants or stubborn debris, a flathead screwdriver can be useful for prying.
The most crucial material is the replacement trimmer line itself. Ensure you select the correct diameter (gauge) recommended by your trimmer’s manufacturer. This information is typically found in your owner’s manual or on a label on the trimmer head. Using the wrong size can lead to inefficient cutting, frequent line breakage, or even damage to your trimmer’s motor. Trimmer lines come in various shapes—round, twisted, square, or star-shaped—each offering different cutting characteristics. While many trimmers can accommodate different shapes, round is a versatile all-rounder, while square or star shapes provide a more aggressive cut for thicker vegetation. Consider your typical trimming tasks when choosing a line shape.
Finally, keeping a few rags handy can help you wipe away any grass clippings or debris from the trimmer head components, ensuring a clean reassembly. Some users also find a light lubricant like WD-40 beneficial for smoother operation of internal parts, though this is optional.
Step-by-Step Guide to Restringing a Bump-Feed Trimmer Head
The bump-feed trimmer head is the most prevalent design, and mastering its restringing process will serve you well. Follow these steps for a quick and effective line replacement.
Preparing Your Trimmer for Restringing
|
Our Picks for the Best String Trimmer in 2026
As an Amazon Associate I earn from qualifying purchases.
|
||
| Num | Product | Action |
|---|---|---|
| 1 | WORX Cordless String Trimmer & Lawn Edger, 12'' Electric Weed Wacker with 5.5 LBS, 20V Weed Eater with 90° Pivoting Head, Battery & Charger Included, WG170.2 |

|
| 2 | Cordless String Trimmer Compatible with Milwaukee M18 18V Battery(Tool Only), 12-Inch 3-in-1 Weed Eater with 8500RPM Upgraded Motor, Automatic Line Feed Weed Wacker for Lawn Edging and Mowing-Red |
|
| 3 | BLACK+DECKER Weed Wacker with Auto Feed, 14-Inch 2 in 1 String Trimmer Lawn Edger, Powerful 6.5-Amp Lightweight Electric Weed Eater (BESTA510) |
|
| 4 | BLACK+DECKER String Trimmer, Electric, 14-inch (BESTE620) |
|
| 5 | BLACK+DECKER 20V MAX Weed Eater, Edger and Sweeper Combo, Includes 2 Batteries and Charger, Cordless Electric Weed Wacker and 130 Mph Hard Surface Leaf Blower, 10 in. (LCC222) |
|
| 6 | CRAFTSMAN WEEDWACKER® String Trimmer, 6.5 Amp, 14-Inch (CMEST913) |
|
| 7 | Cordless String Trimmer Compatible with Dewalt 20V MAX Battery, 12-Inch Weed Wacker Cordless Auto Line Feed,Electric Weed Eater Battery Powered Grass Trimmer w/6 Line Spools(Tool Only) |
|
| 8 | Houselife 12" Cordless Weed Eater Compatible with Dewalt 20V Max Battery (No Battery), Auto Feed Cordless String Trimmer&Weed Wacker, Lightweight Electric 20V Weed Trimmer&Edger for Lawn, Garden, Yard |
|
| 9 | 20V 12" Cordless String Trimmer With 2 X 4.0Ah Battery and Charger, Electric Grass Trimmer Battery Powered Eater String, Edger Lawn Tool Grass Cutter With 8pcs Line, Lawn Mover For Garden Yard, Orange |
|
| 10 | WORX Cordless String Trimmer & Lawn Edger, 12'' Electric Weed Wacker with 4.6 LBS, 20V Weed Eater with 90° Pivoting Head, Batteries & Charger Not Included, WG170.9 |
|
Safety is paramount. Begin by ensuring your string trimmer is completely powered down. For electric models, unplug the power cord. If you have a cordless battery-powered trimmer, remove the battery pack. For gas-powered trimmers, turn off the engine and allow it to cool, then disconnect the spark plug wire to prevent accidental starting. Always wear your protective gloves before you start handling the trimmer head.
Next, take a moment to clean the trimmer head and the surrounding cutting shield. Accumulated grass clippings, dirt, and debris can interfere with the restringing process and the trimmer’s performance. Use a stiff brush or a rag to clear away any obstructions. Inspect the head for any visible damage or worn parts.
Now, you’ll need to remove the cap covering the spool. Most bump-feed heads have tabs on the side that you press inward, or a section you unscrew counter-clockwise. Once the cap is off, carefully extract the inner spool. Note how the old line (if any remains) was wound around it and how it was seated in the head. This visual reference can be helpful during reassembly. Discard any remaining old line.
Cutting and Measuring the New Trimmer Line
The correct length of trimmer line is crucial for optimal performance and to avoid overfilling the spool. While specific lengths can vary by manufacturer, a common recommendation is to cut 20 to 25 feet (approximately 6 to 7.6 meters) of new trimmer line. For dual-line spools, you might cut two equal lengths or one longer piece that is folded in half. Always refer to your trimmer’s manual for precise length recommendations.
Use your sharp cutting tool to make a clean, straight cut. A jagged or uneven end can make it difficult to feed the line into the spool’s anchor holes. Keeping several pre-cut lengths of line coiled and ready can significantly speed up future restrings.
Winding the Line onto the Spool
This is often where people encounter the most difficulty, but it’s straightforward with attention to detail. Locate the anchor hole or holes on the spool. For dual-line spools, there will typically be two distinct sections or channels for winding, often separated by a partition. Insert one end of your new line into an anchor hole and secure it.
Next, pay close attention to the winding direction arrows usually molded onto the spool or the trimmer head itself. It’s vital to wind the line in the direction indicated. As you wind, maintain consistent tension on the line. Wrap it tightly and evenly around the spool, avoiding overlaps or loose coils, which can lead to tangles and line jams. If you have a dual-line spool, ensure each line is wound into its dedicated channel. Wind until only about 6 inches (15 cm) of line remain unwound, extending from the anchor hole.
Many modern trimmer heads, particularly those designed for quick loading, feature a “speed feed” mechanism. Instead of removing the spool, you align specific arrows on the trimmer head and feed a single length of line straight through the eyelets until it’s centered. Then, you simply twist a knob or rotate the head to wind the line internally. This method is exceptionally fast and reduces the chances of winding errors.
Reassembling the Trimmer Head
With the spool neatly wound, it’s time to put everything back together. Carefully thread the remaining ends of the trimmer line through the exit eyelets on the trimmer head. These are the small holes on the outside of the head where the line emerges during operation. Ensure the lines pass cleanly through these openings without catching.
Now, seat the wound spool back into the trimmer head housing. Align any notches or grooves on the spool with corresponding features inside the head. You should feel or hear a satisfying “click” as the spool settles securely into place. Ensure the lines are properly positioned to feed freely.
Finally, replace the trimmer head cap. Align it with the main head, pressing firmly or screwing it clockwise until it locks securely. Give each line a gentle tug to confirm they are held firmly but can still extend from the head. Your trimmer is now restrung and ready for action.
 A close-up of hands carefully winding new trimmer line onto a spool, following directional arrows on the spool, with green trimmer line.
Restringing Other Trimmer Head Types
While the bump-feed head is most common, understanding how to handle fixed-line and automatic-feed types ensures you’re prepared for any trimmer.
Fixed-Line Trimmer Heads
Fixed-line heads are the simplest to restring. They do not have an internal spool. Instead, you use pre-cut lengths of trimmer line, typically 10 to 12 inches (25 to 30 cm) long. To replace a line, simply remove the old, worn-out segment from its slot or eyelet. Then, thread a new, pre-cut piece of line through the designated hole in the trimmer head. Many fixed heads have a locking mechanism or a knotting system to secure the line in place. Pull the line through until it’s evenly balanced on both sides, or until the locking mechanism engages. This process is very quick, often requiring no disassembly of the head itself.
Automatic-Feed Trimmer Heads
Automatic-feed heads are designed for maximum convenience, advancing line as needed without manual intervention. For restringing, many of these systems are quite similar to bump-feed heads, requiring you to remove a cap, extract a spool, and wind new line. The key difference lies in the internal mechanism that detects line length. Some models might use pre-wound cartridges that simply click into place, offering the quickest replacement method. If your automatic-feed trimmer uses a spool, follow the general winding guidelines for bump-feed heads, paying extra attention to any specific manufacturer instructions regarding line tension or placement, as these can affect the automatic feeding mechanism. If you find your automatic feeder isn’t working after restringing, often a careful re-examination of the spool winding and seating is the first troubleshooting step.
Troubleshooting Common Restringing Issues
Even with careful attention, issues can sometimes arise during or after restringing. Knowing how to troubleshoot these common problems will save you time and frustration.
A frequent complaint is that the line won’t feed properly, or gets stuck inside the head. This is often caused by incorrect spool alignment during reassembly. Ensure the spool is seated perfectly straight and that any notches or pins are engaged. Debris, such as grass clippings or dirt, can also block the feed eyelets or clog the internal mechanism, so a thorough cleaning is important. Using the wrong line diameter—either too thick or too thin—can prevent the line from feeding smoothly.
Another common problem is the line breaking too frequently. This can happen if you’re using a line that is too thin for the type of vegetation you’re cutting, or if you’re consistently hitting hard surfaces like concrete, fences, or rocks. Overwinding the spool, or winding it unevenly, can also put excessive strain on the line, causing it to snap prematurely. Ensure you use the manufacturer-recommended line gauge for durability and avoid overtightening the line on the spool.
Sometimes, the trimmer line can melt or fuse together inside the head. This usually occurs due to excessive friction and heat buildup from constant trimming, especially if the line isn’t feeding out regularly. It can also be a symptom of an overfilled spool or unevenly wound line, which increases friction. To prevent this, ensure your spool is wound neatly and not overfilled, and try to bump out new line more frequently to keep the cutting ends fresh and reduce heat buildup. Always use quality trimmer line, as cheaper lines may be more prone to melting.
“The most common mistake I see isn’t the winding itself, but ignoring the small directional arrows on the spool. Get that wrong, and you’ll be fighting tangles all day.” – John Smith, Master Gardener & Small Engine Technician
Maintaining Your Trimmer Head and Line for Longevity
Proper care of your trimmer head and line extends their lifespan, reduces the frequency of restringing, and ensures consistent performance. A well-maintained trimmer is a joy to use.
Regular cleaning is perhaps the simplest yet most effective maintenance task. After each use, or at least periodically, remove the trimmer head cap and clear out any accumulated grass, dirt, or sap from the spool, housing, and eyelets. Debris can hinder line feeding, cause imbalances, and lead to premature wear. Use a stiff brush, a small pick, or compressed air for thorough cleaning.
How you store your trimmer line also impacts its durability. Trimmer line can become brittle over time, especially when exposed to extreme temperatures or direct sunlight. Store your spare spools or bulk line in a cool, dry place away from UV light. Some users even submerge their trimmer line in water for 24-48 hours before use, believing it rehydrates the nylon and makes it more flexible and less prone to breaking.
Finally, while restringing is a routine task, there comes a point when the entire trimmer head may need replacing. Look for signs of significant wear, such as cracks in the housing, damaged eyelets, a malfunctioning bump knob, or a spool that no longer seats properly. These issues can impede line feeding and compromise safety. Replacing a worn head ensures your trimmer operates as intended and prevents more significant damage to the tool. Many universal replacement heads are available that offer enhanced durability or quicker loading mechanisms, providing an opportunity for an upgrade.
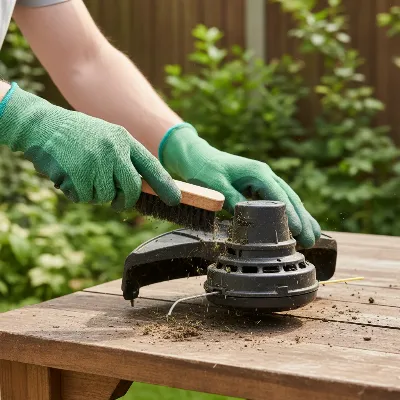 A person cleaning a string trimmer head with a brush, removing grass and debris after use, set against a garden background.
Frequently Asked Questions
What’s the ideal length of trimmer line to use?
For most bump-feed trimmers, a length of 20 to 25 feet (6 to 7.6 meters) is typically recommended. However, always consult your trimmer’s instruction manual, as specific models may have different recommendations to ensure optimal performance and to prevent overfilling the spool.
How do I know which line diameter is right for my trimmer?
The correct line diameter (gauge) is crucial and is usually specified in your trimmer’s owner’s manual or printed on the trimmer head itself. Using a line that’s too thick can strain the motor, while one that’s too thin will break too easily. Common diameters range from 0.065″ for light electric trimmers to 0.095″ or more for heavy-duty gas models.
Why does my trimmer line keep getting stuck or breaking?
Line getting stuck can be due to incorrect winding, improper spool alignment, or debris clogging the eyelets. Frequent breakage often results from using the wrong line diameter for your task, hitting hard surfaces, or line that has become brittle from age or improper storage. Ensure even winding and proper seating of the spool.
Can I use any shape of trimmer line?
While most trimmers can accommodate different line shapes, the type you choose affects cutting performance. Round lines are versatile for general trimming, twisted lines offer more durability and quiet operation, and square or star-shaped lines provide a more aggressive cut for thick weeds. Always ensure the chosen shape is compatible with your trimmer head’s design.
How often should I restring my trimmer?
The frequency of restringing depends heavily on your usage, the type of vegetation you’re cutting, and the quality of your line. For regular lawn maintenance, you might restring every few uses or as soon as the line becomes too short to effectively cut. For heavy-duty tasks, you may need to replace the line more often.
Restring a Bump-Feed Trimmer Head
Learn how to quickly and easily restring a bump-feed string trimmer head, the most common type, in four simple steps.
Ensure your trimmer is powered down by unplugging electric models, removing batteries from cordless ones, or disconnecting the spark plug wire on gas trimmers. Clean the trimmer head and cutting shield of any debris. Remove the cap and inner spool, noting how the old line was wound, then discard any remaining old line.
Cut 20 to 25 feet (6 to 7.6 meters) of new trimmer line, or two equal lengths for dual-line spools, using a sharp cutting tool for a clean, straight cut. Always refer to your trimmer's manual for precise length recommendations to ensure optimal performance and prevent overfilling.
Locate the anchor hole(s) on the spool and insert one end of the new line, securing it. Wind the line tightly and evenly around the spool, following the winding direction arrows, maintaining consistent tension and avoiding overlaps. For dual-line spools, ensure each line is wound into its dedicated channel until about 6 inches (15 cm) remain unwound.
Thread the remaining ends of the trimmer line through the exit eyelets on the trimmer head. Carefully seat the wound spool back into the trimmer head housing, aligning any notches or grooves until it clicks securely into place. Finally, replace the trimmer head cap, pressing firmly or screwing it clockwise until it locks, then gently tug the lines to confirm they are held firmly but can still extend.
Get our weekly buyer guide
Practical specs, not advice. Unsubscribe anytime.
I have an older trimmer and it’s not a bump-feed, fixed-line, or automatic-feed. It’s some weird hybrid that’s always a pain. While the general advice about understanding your head type was good, I wish there was a bit more detail for less common mechanisms. Still, it gave me some ideas to troubleshoot my specific model.
My fixed-line head is super easy to deal with, but I always wondered about the other types. This really clarified the differences, especially how automatic-feed heads work with their pre-wound cartridges. It’s good to know what’s out there and how much simpler my current setup is. Great info for maintaining your equipment.
I used to dread restringing my trimmer, but following these steps made it so much easier. The part about winding the line tightly onto the spool made all the difference. My trimmer is back to cutting like new, and I didn’t even break a sweat. Highly recommend this for anyone who’s been putting off this chore.
I’ve always struggled with my bump-feed head, especially getting the line wound on correctly. The tip about cutting 20 to 25 feet and winding it tightly in the direction of the arrows was a game-changer. It still took me a bit longer than 15 minutes, but the line fed perfectly after that. Definitely a useful guide for anyone with a similar trimmer.