Cleaning a dirty string trimmer carburetor typically takes 1-2 hours and involves draining old fuel, disconnecting the spark plug, removing the carburetor, disassembling it partially, spraying internal passages with carburetor cleaner, clearing clogs with small wire brushes, blowing out debris with compressed air, and then reassembling the unit. This process restores the trimmer’s power and efficiency, preventing issues like hard starting or stalling caused by stale fuel or debris.
Understanding Your String Trimmer Carburetor and Why It Gets Dirty
The carburetor acts as the heart of your string trimmer’s engine, precisely blending gasoline with air before sending it to the combustion chamber. When this delicate balance is disrupted, your trimmer’s performance suffers. Over time, several factors can lead to a dirty carburetor. The most common cause is stale fuel, especially gasoline containing ethanol. Ethanol is hygroscopic, meaning it attracts and absorbs water, which can separate from the fuel and corrode metal components within the carburetor. As fuel evaporates, it leaves behind sticky varnish and gum deposits that can clog tiny jets and passages, restricting fuel flow and choking the engine. Debris, such as dirt or sediment from the fuel tank, can also find its way into the carburetor, contributing to blockages.
Symptoms of a dirty carburetor are usually quite clear:
- Hard Starting: Your trimmer takes multiple pulls to start or won’t start at all.
- Stalling: The engine runs briefly then dies, especially under load or when idling.
- Poor Performance: The trimmer sputters, hesitates, or lacks its usual power.
- Rough Idling: The engine runs erratically, surging or dying at idle.
- Black Smoke from Exhaust: An overly rich fuel mixture, often caused by a clogged carburetor.
- Strong Fuel Smell: Inefficient burning of fuel.
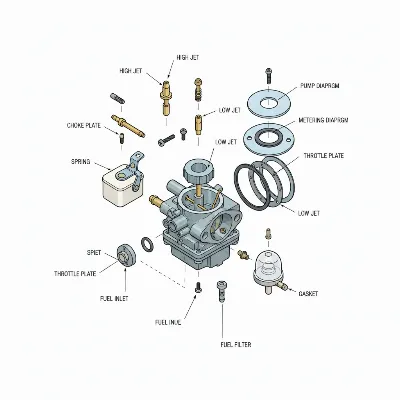 An exploded view of a string trimmer carburetor showing its intricate internal components and passages.
Essential Tools and Materials for Carburetor Cleaning
Before you begin, gather all the necessary tools and materials. Having everything on hand will make the process smoother and more efficient.
Tools:
- Screwdriver Set: Phillips and flathead screwdrivers of various sizes to remove covers and carburetor components.
- Socket Wrench Set: May be needed for carburetor mounting bolts on some models.
- Needle-Nose Pliers: Useful for disconnecting fuel lines and throttle linkages.
- Small Wire Brushes or Picks: Essential for clearing stubborn clogs in tiny passages and jets. A guitar string or very thin wire can also work.
- Compressed Air: A can of compressed air or an air compressor with a blower nozzle to clear passages after spraying cleaner.
- Shop Rags or Paper Towels: For cleaning up spills and wiping down components.
- Safety Glasses and Gloves: Always wear these to protect your eyes and hands from chemicals and debris.
Materials:
- Carburetor Cleaner Spray: A dedicated carburetor cleaner (e.g., CRC Carb and Choke Cleaner, Gumout, or Berryman B-12) designed to dissolve varnish and gum without harming plastic or rubber components. Ensure it’s safe for small engines.
- Fresh Fuel: Always use fresh gasoline for refilling your trimmer.
- Fuel Stabilizer (Optional but Recommended): Helps prevent fuel degradation and future clogs.
Step-by-Step Guide to Cleaning Your String Trimmer Carburetor Fast
While some minor clogs can be addressed by simply spraying carburetor cleaner into the intake while the engine is running, a thorough cleaning, especially for a truly “dirty” carburetor, often requires removal and partial disassembly. This guide focuses on a comprehensive approach.
Safety First: Preparation and Disassembly
|
Our Picks for the Best String Trimmer in 2026
As an Amazon Associate I earn from qualifying purchases.
|
||
| Num | Product | Action |
|---|---|---|
| 1 | Cordless String Trimmer Compatible with Milwaukee M18 18V Battery(Tool Only), 12-Inch 3-in-1 Weed Eater with 8500RPM Upgraded Motor, Automatic Line Feed Weed Wacker for Lawn Edging and Mowing-Red |

|
| 2 | CRAFTSMAN WEEDWACKER® String Trimmer, 6.5 Amp, 14-Inch (CMEST913) |
|
| 3 | BLACK+DECKER 20V MAX Weed Eater, Edger and Sweeper Combo, Includes 2 Batteries and Charger, Cordless Electric Weed Wacker and 130 Mph Hard Surface Leaf Blower, 10 in. (LCC222) |
|
| 4 | WORX Cordless String Trimmer & Lawn Edger, 12'' Electric Weed Wacker with 5.5 LBS, 20V Weed Eater with 90° Pivoting Head, Battery & Charger Included, WG170.2 |
|
| 5 | 20V 12" Cordless String Trimmer With 2 X 4.0Ah Battery and Charger, Electric Grass Trimmer Battery Powered Eater String, Edger Lawn Tool Grass Cutter With 8pcs Line, Lawn Mover For Garden Yard, Orange |
|
| 6 | BLACK+DECKER String Trimmer, Electric, 14-inch (BESTE620) |
|
| 7 | Houselife 12" Cordless Weed Eater Compatible with Dewalt 20V Max Battery (No Battery), Auto Feed Cordless String Trimmer&Weed Wacker, Lightweight Electric 20V Weed Trimmer&Edger for Lawn, Garden, Yard |
|
| 8 | WORX Cordless String Trimmer & Lawn Edger, 12'' Electric Weed Wacker with 4.6 LBS, 20V Weed Eater with 90° Pivoting Head, Batteries & Charger Not Included, WG170.9 |
|
| 9 | Cordless String Trimmer Compatible with Dewalt 20V MAX Battery, 12-Inch Weed Wacker Cordless Auto Line Feed,Electric Weed Eater Battery Powered Grass Trimmer w/6 Line Spools(Tool Only) |
|
| 10 | BLACK+DECKER Weed Wacker with Auto Feed, 14-Inch 2 in 1 String Trimmer Lawn Edger, Powerful 6.5-Amp Lightweight Electric Weed Eater (BESTA510) |
|
Safety is paramount when working with fuel and power tools.
- Ensure the Engine is Off and Cool: Never work on a hot engine.
- Disconnect the Spark Plug Wire: This prevents accidental starting.
- Drain the Fuel Tank: Empty all old fuel into an approved container. This old fuel is likely the source of the problem.
- Remove the Air Filter Cover and Air Filter: This exposes the carburetor. Inspect the air filter; if it’s dirty or soaked with oil, replace it. A clogged air filter can also contribute to performance issues.
- Locate and Disconnect Fuel Lines: Note which line goes to the primer bulb and which goes to the fuel tank. Use needle-nose pliers to gently squeeze and slide off the clamps, then pull the lines.
- Disconnect the Throttle Linkage: Observe how it’s connected before detaching it from the carburetor.
- Remove Carburetor Mounting Bolts: These are typically nuts holding the carburetor to the engine block, often accessible with a socket wrench.
- Carefully Detach the Carburetor: Gently pull the carburetor away from the engine. Be mindful of any gaskets between the carburetor and the engine; try not to damage them.
The Cleaning Process
With the carburetor removed, you can now get to the heart of the problem.
- External Cleaning: Spray the outside of the carburetor thoroughly with carburetor cleaner to remove any accumulated grime or grease. Wipe it down with a shop rag.
- Disassemble the Carburetor (Partially):
- Primer Bulb (if applicable): If your trimmer has a primer bulb, remove the screws holding its assembly in place. Inspect the bulb and diaphragm for cracks or hardening.
- Fuel Bowl/Diaphragm Cover: On most small engine carburetors, you’ll find a small cover (often plastic or metal) secured by several screws. This covers the metering diaphragm and possibly a small screen or needle valve. Carefully remove these screws and gently lift the cover and diaphragm. Note the orientation of the diaphragm and gasket as you remove them, as they must be reinstalled correctly.
- Inspect Internal Components: Look for small jets (tiny brass screws or inserts), passages, and screens. These are the most common points of blockage.
- Spray Internal Passages: With your safety glasses on, generously spray carburetor cleaner into every visible opening, jet, and passage. Focus on the small holes you exposed after removing the cover. You should see the cleaner flushing out gunk and varnish.
- Clear Stubborn Clogs: Use your small wire brushes, picks, or thin wire (like a guitar string) to gently probe and clear any stubborn deposits in the jets and tiny fuel passages. Be careful not to enlarge any holes or scratch delicate surfaces.
- Blow Out with Compressed Air: After spraying and picking, use compressed air to thoroughly blow out all passages, jets, and the carburetor body. This removes loosened debris and residual cleaner, ensuring no blockages remain.
- Inspect Gaskets and Diaphragms: Check all gaskets and rubber diaphragms for damage, tears, hardening, or brittleness. If any are compromised, they should be replaced. Many carburetors have small repair kits available that include new gaskets and diaphragms.
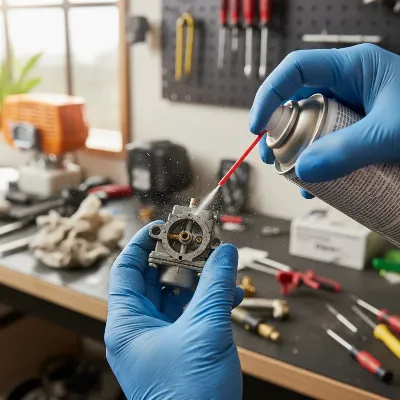 A person cleaning a string trimmer carburetor with spray cleaner and a small brush, emphasizing precision.
Reassembly and Testing
Putting the carburetor back together is essentially the reverse of disassembly.
- Reassemble Carburetor Components: Carefully reinstall the diaphragm, gasket, and primer bulb assembly, ensuring they are correctly oriented. Tighten screws evenly, but do not overtighten, which can damage the housing or gaskets.
- Reattach Carburetor to Engine: Align the carburetor with the engine intake and reinstall the mounting bolts. Tighten securely.
- Reconnect Fuel Lines and Throttle Linkage: Ensure fuel lines are properly seated and clamped. Reattach the throttle linkage, ensuring it operates smoothly without binding.
- Reinstall Air Filter and Cover: Place the air filter back in its housing and secure the cover.
- Refill with Fresh Fuel: Fill the fuel tank with fresh gasoline. For two-stroke engines, use the correct fuel-to-oil mix. Consider adding a fuel stabilizer to the fresh fuel to prevent future issues, especially if the trimmer will sit for extended periods.
- Reconnect Spark Plug Wire: Reattach the spark plug boot.
- Test the Trimmer: Prime the carburetor a few times if it has a primer bulb. Start the engine. It might take a few extra pulls to draw fuel through the system. Once running, let it warm up. If it’s still running rough, you may need to adjust the carburetor’s high and low-speed screws (refer to your trimmer’s owner’s manual for specific adjustment procedures, as these vary by model). Usually, turning them slowly clockwise until the engine falters, then counter-clockwise until it runs smoothly provides a good starting point.
Common Issues and Troubleshooting During Cleaning
Even with a detailed guide, you might encounter some common challenges.
- Stuck or Stripped Screws: Small carburetor screws can be easily damaged. Use the correct screwdriver size and apply steady pressure. If a screw is stuck, a penetrating oil might help.
- Damaged Gaskets or Diaphragms: If cleaning doesn’t resolve the issue or if these parts are visibly damaged, replace them. Carburetor rebuild kits are relatively inexpensive and contain these critical components.
- Carburetor Beyond Cleaning: In some cases, especially with severe corrosion from old, ethanol-blended fuel, the carburetor might be damaged beyond repair through cleaning. If, after a thorough cleaning and replacing gaskets, your trimmer still runs poorly, consider replacing the entire carburetor. Generic replacement carburetors for many string trimmer models are often readily available and affordable.
- Engine Still Runs Rough: If the carburetor cleaning doesn’t fix the problem, inspect other components such as the fuel filter, spark plug, and spark arrestor, as these can also cause similar symptoms.
Preventing Future Carburetor Clogs
An ounce of prevention is worth a pound of cure, especially when it comes to carburetor maintenance.
- Use Fresh, Stabilized Fuel: This is the most critical preventative measure. Purchase only enough fuel to last for 30-60 days. Always add a high-quality fuel stabilizer to your gasoline, even if you plan to use it quickly.
- Drain Fuel for Long-Term Storage: If you won’t be using your string trimmer for more than a month, it’s best to drain the fuel tank completely and run the engine until it stalls to clear fuel from the carburetor. This prevents fuel from breaking down and creating deposits.
- Regular Air Filter Checks: Inspect and clean or replace your air filter regularly. A clean air filter prevents dirt and debris from entering the carburetor.
- Consider Ethanol-Free Fuel: If available and economically feasible, using ethanol-free gasoline can significantly reduce the risk of carburetor issues caused by ethanol degradation.
> “Preventative measures like using fresh, stabilized fuel and draining your tank for storage are far more effective and less time-consuming than repeatedly cleaning a clogged carburetor.” – John Smith, Small Engine Repair Technician, 10+ Years Experience
Conclusion
A dirty string trimmer carburetor can be a frustrating obstacle to a well-maintained yard, but it doesn’t have to lead to an expensive trip to the repair shop. By understanding its function, recognizing the symptoms of a clog, and following this detailed DIY cleaning guide, you can restore your string trimmer’s performance and prolong its lifespan. Remember to prioritize safety, use the right tools, and take preventative measures to keep your carburetor clean for seasons to come.
What steps will you take today to ensure your string trimmer runs flawlessly for years?
Frequently Asked Questions
Frequently Asked Questions
How often should I clean my string trimmer carburetor?
You should clean your string trimmer carburetor every 1-2 years, or whenever symptoms of a clog appear, such as hard starting or stalling. This frequency assumes you use fresh, stabilized fuel and store the trimmer properly. Heavy use or poor fuel management may require more frequent cleaning.
Can I use gasoline to clean a carburetor?
No, plain gasoline is not an effective carburetor cleaner and poses a significant fire hazard. Always use a purpose-designed carburetor cleaner spray, such as CRC Carb and Choke Cleaner, which contains powerful solvents specifically formulated to dissolve gum and varnish without damaging delicate components.
What are the signs of a bad carburetor on a string trimmer?
Signs of a bad carburetor include persistent difficulty starting, rough idling, frequent stalling, significant loss of power, excessive black smoke from the exhaust, or a strong fuel odor. If a thorough cleaning and gasket replacement do not resolve these issues, the carburetor may be corroded or damaged beyond repair and require replacement.
Do I need to remove the carburetor from the engine to clean it thoroughly?
Yes, for a thorough cleaning, especially when dealing with significant clogs, removing the carburetor from the engine and partially disassembling it is highly recommended. While external sprays can offer a temporary fix for minor issues, they typically cannot reach and clear all the tiny internal passages and jets where deposits accumulate.
What tools are essential for cleaning a string trimmer carburetor?
Essential tools for cleaning a string trimmer carburetor include a screwdriver set, needle-nose pliers, small wire brushes or picks, compressed air, shop rags, safety glasses, and gloves. You will also need a dedicated carburetor cleaner spray and fresh fuel.
Clean a Dirty String Trimmer Carburetor
This guide outlines the steps to thoroughly clean a dirty string trimmer carburetor, restoring its performance and efficiency.
Ensure the engine is off and cool, then disconnect the spark plug wire for safety. Drain all old fuel from the tank into an approved container. Remove the air filter cover and air filter, then locate and disconnect the fuel lines and throttle linkage before carefully detaching the carburetor from the engine.
Spray the outside of the carburetor with cleaner and wipe it down. Partially disassemble the carburetor by removing the primer bulb (if applicable) and the fuel bowl/diaphragm cover. Generously spray carburetor cleaner into all visible openings, jets, and passages, focusing on areas exposed after removing the cover.
Use small wire brushes, picks, or a thin wire to gently probe and clear any stubborn deposits in the jets and tiny fuel passages. After spraying and picking, use compressed air to thoroughly blow out all passages, jets, and the carburetor body. This removes loosened debris and residual cleaner, ensuring no blockages remain.
Inspect all gaskets and rubber diaphragms for damage; replace them if compromised. Carefully reinstall the diaphragm, gasket, and primer bulb assembly, ensuring correct orientation. Reattach the carburetor to the engine, reconnect fuel lines and throttle linkage, and reinstall the air filter and cover.
Fill the fuel tank with fresh gasoline, adding a fuel stabilizer if desired. Reconnect the spark plug wire. Prime the carburetor if it has a primer bulb, then start the engine. Allow it to warm up and adjust the high and low-speed screws if necessary, referring to your trimmer's owner's manual for specific procedures.
Get our weekly buyer guide
Practical specs, not advice. Unsubscribe anytime.
My Husqvarna trimmer was hard starting and I knew it was due to stale fuel from last season. This guide walked me through the whole process of removing and disassembling the carburetor. It was a bit intimidating at first, but the detailed steps made it manageable. Very happy with the results!
This was super helpful! My electric trimmer was having trouble starting and I suspected the carburetor. Draining the old fuel and spraying the internal passages with cleaner was key. It took me a bit longer than the 1-2 hours mentioned, but the instructions were clear enough for a beginner like me.
I followed the guide for my old Craftsman trimmer. The part about disconnecting the spark plug was good to remember for safety. However, I still had some trouble getting it to idle smoothly after reassembly. Maybe I missed a spot with the carburetor cleaner, but it’s definitely better than it was.
I’ve had my gas trimmer for years and it started stalling out constantly. I was about to buy a new one, but then I found this guide. The steps for clearing clogs with small wire brushes and compressed air really made a difference. My trimmer runs like new now, saved me a ton of money!