Few things are as frustrating during yard work as your string trimmer line snapping repeatedly. What starts as a simple task to tidy up edges can quickly turn into a time-consuming battle of re-feeding and replacing line, costing you both patience and money. Understanding the common culprits behind frequent line breakage is the first step toward a smoother, more efficient trimming experience. This guide will walk you through everything from selecting the right line and mastering proper techniques to essential maintenance and clever DIY tricks, ensuring your string trimmer stays on task, not on your nerves.
Understanding Why Your String Trimmer Line Fails
Before we can prevent line breakage, we need to pinpoint why it happens. Several factors, often overlooked, contribute to your string trimmer line failing prematurely. Identifying these issues is key to implementing effective solutions.
One of the most frequent reasons for line snapping is contact with hard surfaces. Accidentally striking fences, rocks, concrete, tree trunks, or paving edges can quickly shred or weaken the line. Even minor taps against these abrasive objects can compromise the line’s integrity, making it susceptible to breaking under normal tension.
Another significant factor is using the wrong type or size of line. A line that is too thin for your trimmer or for the density of the weeds you’re tackling will easily snap. Conversely, a line that is too thick for your specific trimmer model can lead to jams, excessive strain on the motor, and eventually, breakage. It’s crucial to match the line diameter and type to your equipment and the job at hand.
The age and storage conditions of your trimmer line also play a vital role. Nylon line, the primary material for most trimmer strings, can become brittle if it’s old, has been stored in a hot environment like a shed, or has simply dried out over time. Nylon naturally contains some water, and as it ages and dries, it loses its flexibility, making it prone to snapping.
Improper winding on the spool is a common, yet easily preventable, issue. If the line isn’t wound evenly and tightly, it can tangle, overlap, or get stuck. Over-winding can create excessive tension, while under-winding leads to loose loops that can jam or cause the line to prematurely feed out and break.
Your trimming technique also heavily influences line durability. Aggressively “whacking” thick stalks, holding the trimmer at an incorrect angle, or pushing too hard into dense material without letting the line’s tip do the work can put immense strain on the string, causing it to fray and break.
Finally, overheating and friction within the trimmer head can lead to problems. Continuous operation can cause the line inside the spool to generate enough heat to compromise its strength, or even melt and “weld” sections together, preventing smooth feeding and leading to breakage. Worn-out components like eyelets, springs, or the bump knob in the trimmer head can also create friction or improper feeding, resulting in frequent line failure.
Selecting the Right Line for Enhanced Durability
Choosing the correct string trimmer line is often the most impactful step you can take to prevent frequent breakage and improve overall performance. With a variety of materials, shapes, and diameters available, knowing what to look for can significantly extend your line’s life.
Importance of Matching Line to Trimmer and Task
|
Our Picks for the Best String Trimmer in 2026
As an Amazon Associate I earn from qualifying purchases.
|
||
| Num | Product | Action |
|---|---|---|
| 1 | WORX Cordless String Trimmer & Lawn Edger, 12'' Electric Weed Wacker with 5.5 LBS, 20V Weed Eater with 90° Pivoting Head, Battery & Charger Included, WG170.2 |

|
| 2 | CRAFTSMAN WEEDWACKER® String Trimmer, 6.5 Amp, 14-Inch (CMEST913) |
|
| 3 | Houselife 12" Cordless Weed Eater Compatible with Dewalt 20V Max Battery (No Battery), Auto Feed Cordless String Trimmer&Weed Wacker, Lightweight Electric 20V Weed Trimmer&Edger for Lawn, Garden, Yard |
|
| 4 | 20V 12" Cordless String Trimmer With 2 X 4.0Ah Battery and Charger, Electric Grass Trimmer Battery Powered Eater String, Edger Lawn Tool Grass Cutter With 8pcs Line, Lawn Mover For Garden Yard, Orange |
|
| 5 | WORX Cordless String Trimmer & Lawn Edger, 12'' Electric Weed Wacker with 4.6 LBS, 20V Weed Eater with 90° Pivoting Head, Batteries & Charger Not Included, WG170.9 |
|
| 6 | BLACK+DECKER String Trimmer, Electric, 14-inch (BESTE620) |
|
| 7 | Cordless String Trimmer Compatible with Dewalt 20V MAX Battery, 12-Inch Weed Wacker Cordless Auto Line Feed,Electric Weed Eater Battery Powered Grass Trimmer w/6 Line Spools(Tool Only) |
|
| 8 | BLACK+DECKER 20V MAX Weed Eater, Edger and Sweeper Combo, Includes 2 Batteries and Charger, Cordless Electric Weed Wacker and 130 Mph Hard Surface Leaf Blower, 10 in. (LCC222) |
|
| 9 | BLACK+DECKER Weed Wacker with Auto Feed, 14-Inch 2 in 1 String Trimmer Lawn Edger, Powerful 6.5-Amp Lightweight Electric Weed Eater (BESTA510) |
|
| 10 | Cordless String Trimmer Compatible with Milwaukee M18 18V Battery(Tool Only), 12-Inch 3-in-1 Weed Eater with 8500RPM Upgraded Motor, Automatic Line Feed Weed Wacker for Lawn Edging and Mowing-Red |
|
Always consult your string trimmer’s manual to find the recommended line diameter. Using a line that’s too thick can strain the motor, while one that’s too thin will snap easily. Beyond diameter, consider the type of vegetation you typically encounter. Light grass demands a different line than dense weeds or woody brush.
Exploring Different Materials and Shapes
Trimmer lines are primarily made from nylon, but many feature reinforced copolymer or even titanium coatings for increased durability and strength.
The shape of the line also affects its cutting efficiency and resistance to breakage:
- Round Line: This is the most common and versatile type, ideal for general-purpose trimming. Its circular form makes it highly resistant to breakage, especially when encountering hard objects like concrete or metal, as it tends to deflect rather than snap.
- Square, Star, Hexagonal, and Multi-sided Lines: These lines offer sharper edges, making them excellent for slicing through thick grass and tougher weeds. However, they can be more prone to wearing down or breaking if they frequently hit abrasive surfaces.
- Twisted Line: Designed for tougher vegetation, twisted lines offer enhanced cutting power and high wear resistance. Their aerodynamic design can also reduce noise and vibration, making them a good choice for harsh surfaces.
Choosing the Correct Diameter
Generally, thicker lines offer more durability.
- 0.065″ – 0.080″: Best for light-duty trimming of soft grasses.
- 0.085″ – 0.105″: Suitable for medium grass and weeds, a good all-around choice for most homeowners.
- 0.110″ – 0.155″+: Designed for heavy-duty commercial use, tackling thick brush, woody weeds, and demanding conditions.
Top Durable Line Recommendations
Some lines consistently receive high marks for durability:
- Echo Black Diamond: Often lauded as a top choice for homeowners, known for durability and clean cuts.
- Husqvarna Titanium Force: A strong contender, especially for medium to heavy-duty tasks, featuring a nylon polymer with a titanium coating.
- STIHL X-line: A favorite among professionals for its strength and precision in tough conditions.
- Oregon Magnum Gatorline: Known for heavy-duty commercial use, with robust, square-shaped lines that resist breaking.
By selecting a line specifically designed for your trimmer and your typical trimming environment, you’ll immediately see a reduction in line breakage.
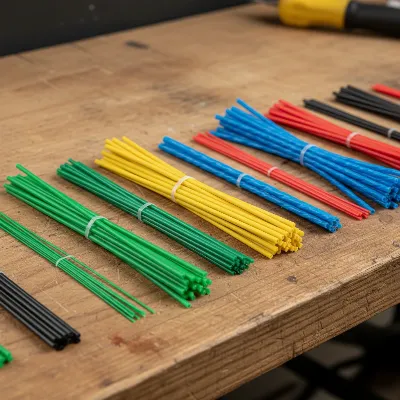 Close-up of various string trimmer line shapes and diameters, illustrating round, square, and twisted lines side by side on a workbench.
Mastering Effective Trimming Techniques to Prevent Breakage
Even with the most durable line, poor technique can lead to frustrating breakage. Mastering a few fundamental trimming methods will not only save your line but also result in a cleaner, more efficient cut.
The “Tip-Cutting” Approach
The most crucial technique is to let the tip of the line do the work. The string trimmer’s line cuts effectively due to its high speed and the stiffness created by centrifugal force. Instead of forcing the entire head into thick vegetation, gently “feather” the line’s tip against the grass or weeds. This allows the sharpest, most effective part of the line to do its job without putting undue stress on the rest of the string. Avoid aggressively “whacking” or jamming the trimmer head into dense patches, as this will quickly fray and snap the line.
Maintaining Proper Distance from Obstacles
Hard surfaces are the arch-nemesis of trimmer line. Fences, rocks, concrete paths, tree trunks, and decorative landscaping elements will instantly weaken or break your line. Develop a habit of maintaining a slight distance from these obstacles. Use a controlled, sweeping motion to trim around them, gradually working your way closer if necessary, but always keeping the rotating line tip just clear of direct contact. For areas very close to hard surfaces, consider a gentler touch or even manual weeding to preserve your line. Many trimmers also feature a plant guard, which can help maintain this protective distance.
Controlling Trimmer Speed and Angle
Adjusting your trimmer’s speed and angle can significantly impact line durability.
- Throttle Control: When trimming near hard surfaces or through thicker weeds, ease off the throttle slightly. A slower line speed reduces the impact force, making the line less prone to snapping. For trimmers with variable speed settings, experiment to find the “sweet spot” where the line cuts effectively without excessive force.
- Proper Angle: Hold the trimmer head as parallel to the ground as possible for general trimming. When edging, position it vertically. Avoid awkward angles that cause the line to strike surfaces broadly or at an inefficient angle, as this increases friction and wear.
Preparing Your Trimming Area
A few moments of preparation can save a lot of line. Before starting, inspect your trimming area and remove any loose rocks, sticks, toys, or other debris that could become projectile hazards or cause instant line breakage. Clearing the path minimizes accidental impacts and allows you to focus on precise trimming.
Essential Maintenance Practices for Line Longevity
Regular maintenance extends the life of your string trimmer and, crucially, its line. A well-maintained tool operates more efficiently, reducing stress on the line and preventing common breakage issues.
Regular Cleaning of the Trimmer Head
Dirt, grass clippings, and debris can accumulate inside the trimmer head, leading to friction, clogs, and improper line feeding. After each use, or at least periodically, clean the trimmer head thoroughly.
- Turn Off and Disconnect: Always ensure the trimmer is off and disconnected from its power source (unplugged for electric, battery removed for cordless, spark plug disconnected for gas) before performing any cleaning or maintenance.
- Brush Away Debris: Use a stiff brush or a stick to clear out any packed grass or dirt from around the spool, eyelets, and the cutting guard. For a deeper clean, you might need to disassemble the head according to your manual. This prevents line from getting stuck or melting together due to heat buildup.
Proper Storage of Trimmer Line
How you store your spare trimmer line significantly affects its flexibility and lifespan. Nylon line can become brittle over time, especially when exposed to heat and direct sunlight.
- Cool, Dry Place: Store your trimmer line in a cool, dry, and dark location. Avoid leaving spools in a hot garage, shed, or in direct sunlight.
- Sealed Container: For extra protection, you can store larger spools in a sealed plastic bag or container to help retain their moisture content and prevent drying out.
Inspecting and Replacing Worn Parts
The trimmer head itself contains components that wear down and can cause line problems.
- Eyelets: The small holes (eyelets) through which the line feeds can become worn, rough, or chipped, creating sharp edges that fray and break the line. Inspect them regularly and replace them if they show signs of wear.
- Springs and Bump Knobs: For bump-feed trimmers, the internal spring and the bump knob itself can wear out, leading to improper line feeding or tension issues. Replace these parts if they are damaged or no longer function correctly.
Ensuring a Sharp Cutting Knife
Most string trimmer guards have a small blade or cutting knife designed to automatically trim the line to the correct length when it’s fed out. If this knife becomes dull or damaged, it won’t cut the line cleanly. This can result in overly long line that drags, tangles, or places excessive strain on the trimmer. Periodically check this blade and sharpen it with a file or replace it if it’s too worn.
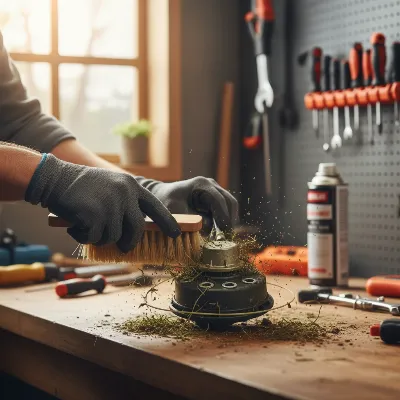 Person cleaning a string trimmer head with a brush, removing grass and debris, highlighting the importance of maintenance.
Simple DIY Hacks to Fortify Your Trimmer Line
Beyond proper technique and maintenance, a couple of clever DIY tricks can significantly improve your line’s flexibility and feeding, further reducing breakage. These are quick, easy solutions that can make a noticeable difference.
The Benefits of Pre-Soaking Your Line
One of the most widely recommended and effective DIY hacks is pre-soaking your trimmer line in water. As discussed, nylon line can dry out and become brittle, similar to dry spaghetti.
- How to Do It: Simply take your spool of new or existing line and submerge it in a bucket of water. Let it soak overnight or for at least 24 hours before you plan to use it.
- The Result: The water absorption rehydrates the nylon, making the line more pliable, flexible, and less prone to snapping under stress. This simple step can dramatically increase your line’s durability, especially if you’ve stored it for a long time or in warm conditions.
Lubricating the Trimmer Head for Smoother Feeding
Friction within the trimmer head can cause the line to stick, tangle, or melt, leading to breakage or feeding issues. A little lubrication can go a long way.
- Using WD-40 or Silicone Spray: Before loading your line or even periodically during use, spray a small amount of WD-40 or a silicone-based lubricant directly into the eyelets and around the area where the line feeds into the spool.
- The Result: This lubrication reduces friction, allowing the line to feed out more smoothly when you bump the head or when the auto-feed mechanism engages. It can also help prevent the line from “welding” itself together inside the spool due to heat buildup. If you’re concerned about chemicals on your lawn, check for biodegradable options or apply sparingly.
These simple, low-cost hacks can significantly extend your line’s life and make your trimming tasks much less frustrating.
Troubleshooting Common Line Breakage Scenarios
Even with the best practices, you might encounter specific line breakage issues. Knowing how to diagnose and address these common scenarios can save you time and prevent further frustration.
Line Breaks Immediately After Starting
If your line snaps almost as soon as you start the trimmer or shortly after you begin cutting, several factors could be at play:
- Brittle Line: The most likely culprit is old, dried-out, or poorly stored line that has become brittle. Even fresh line can be brittle if it’s a cheaper, lower-quality type. Solution: Pre-soak the line in water or replace it with fresh, high-quality line.
- Improper Winding: If the line was wound too loosely or unevenly on the spool, it can tangle and snap under initial tension. Solution: Rewind the line tightly and evenly, ensuring no overlaps.
- Incorrect Diameter: A line that is too thin for your trimmer’s power or the intended task will break instantly. Solution: Ensure you are using the manufacturer-recommended line diameter.
Line Fusing Inside the Spool
This happens when heat generated by the spinning head causes the nylon strands to melt and stick together, preventing the line from feeding out.
- Causes: Continuous, heavy use, especially in hot weather, can cause the spool to overheat. Improper winding can also create friction points that generate heat.
- Solution: Disassemble the trimmer head, unwind the line, and carefully cut away any fused sections. Rewind the remaining line, making sure it’s taut and even. Consider pre-soaking your line and lubricating the head to reduce friction. Taking short breaks during extended trimming sessions allows the head to cool down. If the problem persists, a higher-quality “anti-weld” or “anti-fuse” line might be necessary.
Line Not Feeding Correctly
Sometimes the line doesn’t break but simply refuses to feed out, even when you bump the head or if it’s an auto-feed model.
- Clogged Eyelets/Head: Dirt, grass, or debris can clog the line exit eyelets or jam the feeding mechanism inside the head. Solution: Thoroughly clean the trimmer head and eyelets. Disassemble if necessary to reach internal components.
- Worn Head Components: Damaged eyelets, a weak or broken spring, or a faulty bump knob can prevent proper feeding. Solution: Inspect these parts and replace any that are worn or broken.
- Incorrect Line Installation: Ensure the line is threaded correctly through the head and wound in the direction indicated by the manufacturer (usually an arrow on the spool). Solution: Refer to your trimmer’s manual for proper line installation and winding instructions.
By systematically troubleshooting these common issues, you can often quickly resolve line breakage problems and get back to a productive trimming session.
Conclusion
Frequent string trimmer line breakage can transform a simple chore into a frustrating ordeal, but with a clear understanding of the causes and the right solutions, you can significantly improve your trimming experience. From selecting a durable line that matches your trimmer and tasks, to employing mindful cutting techniques that avoid unnecessary strain, every step contributes to a longer-lasting line. Implementing routine maintenance, such as keeping the trimmer head clean and storing your line properly, is crucial. Furthermore, simple DIY hacks like pre-soaking your line and lubricating the head can make a world of difference in preventing brittleness and ensuring smooth feeding.
By adopting these practices, you’ll not only save money on replacement line but also reclaim your precious time and enjoy a more efficient, less interrupted approach to maintaining your yard. What specific challenge do you find most difficult to overcome with your string trimmer?
Frequently Asked Questions
How often should I replace my trimmer line?
There’s no fixed schedule; it depends on usage, trimming conditions, and line quality. You should replace your line when you notice it’s frayed, discolored, significantly shortened, or frequently breaking, even with proper technique. For heavy use, it might be multiple times a season, while for light home use, perhaps once a season.
Can old trimmer line cause breakage?
Yes, absolutely. Trimmer line, especially nylon, can dry out and become brittle over time, losing its flexibility and making it much more susceptible to breaking. Proper storage in a cool, dry place and pre-soaking old line in water can help restore some pliability.
What’s the best line for heavy-duty trimming?
For heavy-duty tasks involving thick weeds or brush, look for a thicker line diameter (e.g., 0.105″ to 0.155″) made from reinforced copolymer or titanium-coated materials. Shapes like square, star, or twisted lines also offer better cutting power and durability for aggressive cutting. Brands like Oregon Magnum Gatorline or STIHL X-line are popular for demanding jobs.