A malfunctioning gearbox can significantly hinder your string trimmer’s performance, leading to frustrating interruptions during yard work. Fortunately, many common gearbox issues can be resolved with a bit of DIY know-how. This guide will walk you through the essential steps for diagnosing and repairing your string trimmer’s gearbox, helping you get back to a pristine lawn without the need for a professional.
Understanding Your String Trimmer Gearbox
The gearbox is a critical component that transfers power from the engine or motor to the trimmer head, allowing it to spin at high speeds. It typically contains a set of gears, bearings, and often a small amount of grease for lubrication. Over time, these internal components can wear out, become damaged, or lose lubrication, leading to various operational problems. Recognizing the signs of a failing gearbox, such as unusual noises, excessive vibration, or a non-spinning head, is the first step toward a successful repair.
Diagnosing Common Gearbox Problems
Before you begin any repair, it’s crucial to accurately diagnose the problem. Start by inspecting the exterior of the gearbox for any visible damage, cracks, or leaks. Then, try to manually spin the trimmer head (with the engine off and spark plug disconnected for gas models) to feel for any resistance or grinding. Common issues include worn gears, seized bearings, or a lack of lubrication. A high-pitched whine often indicates dry or failing bearings, while a grinding sound points to damaged gears. If the head doesn’t spin at all, the drive shaft connection or internal gears might be completely stripped.
Step-by-Step Gearbox Disassembly and Inspection
|
Our Picks for the Best String Trimmer in 2026
As an Amazon Associate I earn from qualifying purchases.
|
||
| Num | Product | Action |
|---|---|---|
| 1 | CRAFTSMAN WEEDWACKER® String Trimmer, 6.5 Amp, 14-Inch (CMEST913) |

|
| 2 | WORX Cordless String Trimmer & Lawn Edger, 12'' Electric Weed Wacker with 5.5 LBS, 20V Weed Eater with 90° Pivoting Head, Battery & Charger Included, WG170.2 |
|
| 3 | WORX Cordless String Trimmer & Lawn Edger, 12'' Electric Weed Wacker with 4.6 LBS, 20V Weed Eater with 90° Pivoting Head, Batteries & Charger Not Included, WG170.9 |
|
| 4 | BLACK+DECKER String Trimmer, Electric, 14-inch (BESTE620) |
|
| 5 | Cordless String Trimmer Compatible with Milwaukee M18 18V Battery(Tool Only), 12-Inch 3-in-1 Weed Eater with 8500RPM Upgraded Motor, Automatic Line Feed Weed Wacker for Lawn Edging and Mowing-Red |
|
| 6 | 20V 12" Cordless String Trimmer With 2 X 4.0Ah Battery and Charger, Electric Grass Trimmer Battery Powered Eater String, Edger Lawn Tool Grass Cutter With 8pcs Line, Lawn Mover For Garden Yard, Orange |
|
| 7 | BLACK+DECKER 20V MAX Weed Eater, Edger and Sweeper Combo, Includes 2 Batteries and Charger, Cordless Electric Weed Wacker and 130 Mph Hard Surface Leaf Blower, 10 in. (LCC222) |
|
| 8 | BLACK+DECKER Weed Wacker with Auto Feed, 14-Inch 2 in 1 String Trimmer Lawn Edger, Powerful 6.5-Amp Lightweight Electric Weed Eater (BESTA510) |
|
| 9 | Houselife 12" Cordless Weed Eater Compatible with Dewalt 20V Max Battery (No Battery), Auto Feed Cordless String Trimmer&Weed Wacker, Lightweight Electric 20V Weed Trimmer&Edger for Lawn, Garden, Yard |
|
| 10 | Cordless String Trimmer Compatible with Dewalt 20V MAX Battery, 12-Inch Weed Wacker Cordless Auto Line Feed,Electric Weed Eater Battery Powered Grass Trimmer w/6 Line Spools(Tool Only) |
|
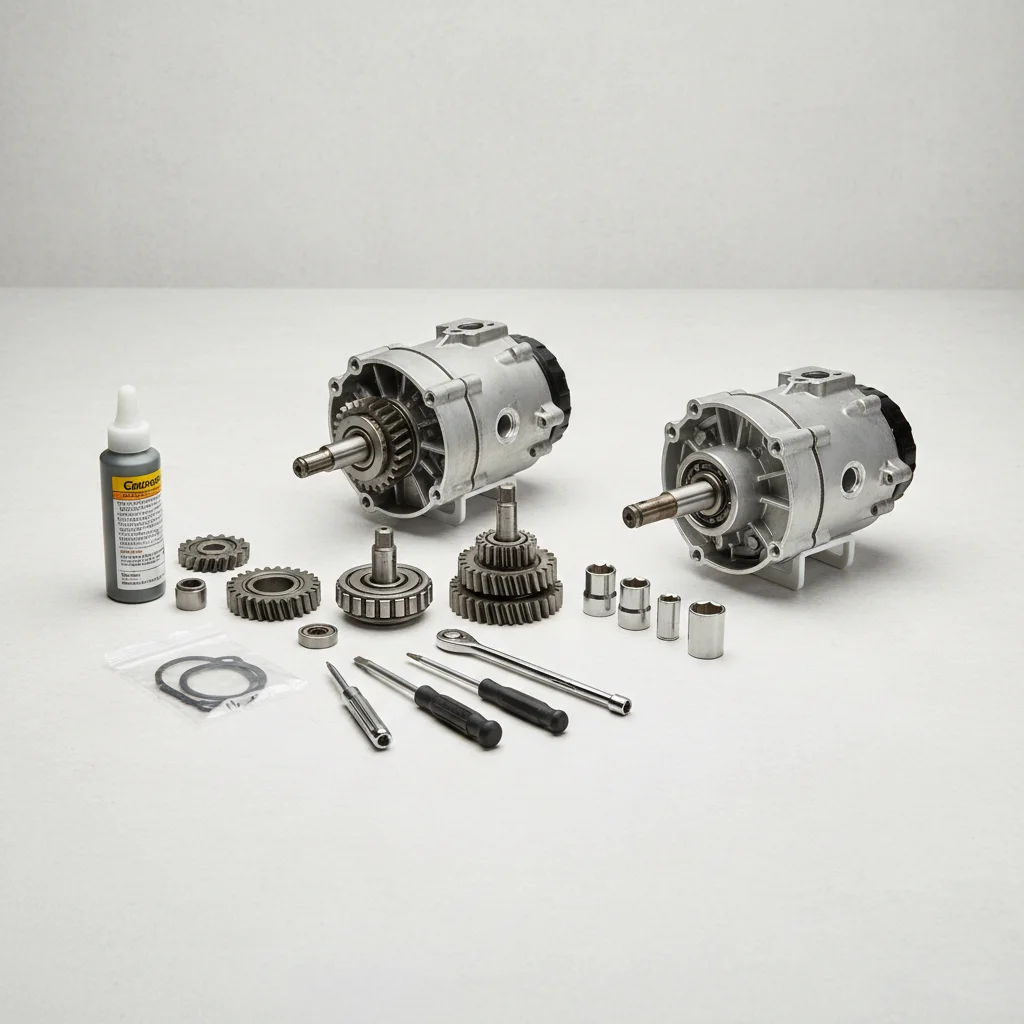
To access the internal components, you’ll need to carefully disassemble the gearbox. Begin by removing the trimmer head, usually by unscrewing it or depressing a tab. Next, locate and remove the screws or bolts that secure the gearbox housing to the shaft. Once the housing is open, carefully remove the gears and bearings. Inspect each component for signs of wear, such as chipped teeth on gears, rust, or rough movement in the bearings. Pay close attention to any metal shavings, which are a clear indicator of internal wear.
- Remove the trimmer head carefully.
- Unscrew or unbolt the gearbox housing from the shaft.
- Gently extract gears and bearings for inspection.
- Check for chipped teeth, rust, or rough bearing movement.
- Look for metal shavings inside the housing.
Replacing Worn Components and Relubrication
Once you’ve identified the faulty parts, it’s time for replacement. Source genuine replacement gears and bearings specific to your string trimmer model. Installing new components is usually the reverse of disassembly. Before reassembling, thoroughly clean the gearbox housing and apply fresh, high-quality gearbox grease. Proper lubrication is vital for smooth operation and extending the lifespan of your new parts. Ensure all components are seated correctly and move freely before sealing the housing.
Reassembly and Testing Your Repaired Gearbox
With new components in place and fresh lubrication, carefully reassemble the gearbox, ensuring all screws are tightened to the manufacturer’s specifications. Reattach the trimmer head. Before using the trimmer for actual yard work, perform a test run. Start the trimmer and observe the head’s rotation. Listen for any unusual noises and check for excessive vibration. A smoothly operating head with minimal noise indicates a successful repair. If problems persist, re-examine your work or consult your trimmer’s service manual.
Preventative Maintenance for Gearbox Longevity
To prevent future gearbox issues, regular maintenance is key. Periodically check the gearbox for any signs of leaks or damage. For models with grease ports, apply fresh grease as recommended by the manufacturer, typically once a season. Avoid overloading your trimmer by trying to cut through excessively thick brush, which can put undue strain on the gearbox. Proper storage in a dry, clean environment also helps protect internal components from corrosion and wear.
Get our weekly buyer guide
Practical specs, not advice. Unsubscribe anytime.
Fantastic resource! My commercial-grade trimmer was experiencing significant power loss to the head. I followed the advice on checking for damaged components and found a stripped gear. The guide made the repair process straightforward, and now it’s running like new again. Highly recommend for anyone with a similar issue.
This guide was a lifesaver! My electric trimmer started making a grinding noise and I thought it was toast. Following the steps for checking the gears and adding new grease really fixed it up. Saved me a ton of money not having to buy a new one or take it to a shop.
I appreciated the detailed breakdown of how the gearbox works and what to look for. My gas trimmer was having trouble with the head spinning inconsistently. Turns out, a bearing was worn. The instructions were clear enough for me to replace it myself, though it took a bit longer than I expected.
Good info on diagnosing the problem, especially the part about unusual noises. My trimmer was definitely making some weird sounds. However, I found it a bit tricky to actually get to the gearbox on my specific model, even with the general tips. Ended up needing a special tool I didn’t have.